may be found on the following UCF Web page:
http://pegasus.cc.ucf.edu/~help/download/
Don't forget the tilde (<~>), located next to the (<1>) key (on most keyboards). If you do not have a Web browser installed on your machine, you can use the lynx command on Pegasus as follows:
pegasus% lynx http://pegasus.cc.ucf.edu/~help/download/
See Using Lynx to Surf the Internet for more details on using lynx.
Note: The manufacturers
of the above software are constantly making improvements to their
products. As new versions of the software are made available,
the filenames will often change. Additionally, you may see test
(beta) versions which typically precede the release of a new version
of the software; use these test versions at your own risk.
If you wish to use the lynx command to download Netscape,
you will need to place the file in the /tmp
directory. You will then download the saved file to your personal
computer. General information about downloading files via a phone
modem may be found in Transfering Files Via Modem. To download Netscape using the
lynx download page, do the following:
pegasus% cd /tmp
pegasus% lynx http://pegasus.cc.ucf.edu/~help/download/
pegasus% kermit -i -s /tmp/filename
where filename is the name of the file
you wish to download
INTERNET STARTER KIT FOR WINDOWS
3.1
Minimum Requirements
| (407)275-4200 | Main UCF campus and Orlando area |
| (407)513-4200 | Main UCF campus and Orlando area |
| (407)636-9985 | Brevard Area |
| (904)255-9906 | Daytona Area |
If you have to enter any prefixes to turn off call
waiting or to dial out of a phone system, please enter those numbers
before the calling number.
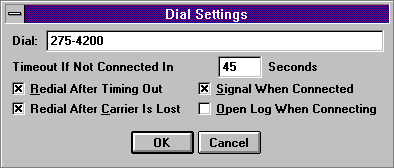
Set the Timeout to 90 seconds. This should
allow you more than enough time to connect to the terminal server.
Also select Redial After Timing Out, Signal
When Connected, and Redial After Carrier Is Lost.
The figure below shows the settings to call from
Campus with a prefix of 7 and the above settings.
7) Login:
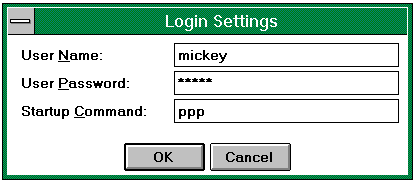
Here you enter your username for Pegasus and the
password. If you are using a dataphone, type any string of characters
for the userid and leave the password field blank. The Startup
Command is ppp. Your userid needs to be in lowercase
and the password will show as asterisks as you type it. Below
is the an example for a user named mickey with a password
of mouse.
Note: If you change your Pegasus password,
be sure to update the password in the above Login Settings box.
8) Interface Name: This
does not need to be set or used at this moment.
9) Log: This does not
need to be set or used at this moment.
132.170.240.15
132.170.249.15
The Domain Servers box should look like the following
when you are finished:
These are all the necessary entries that need to
be made to configure Custom. Save the file by selecting
File and then Save. Exit Chameleon and restart it.
The script modifications for a computer with a modem
are as follows:
[UCF]
SCRIPT=name: $u$r word: $p$r
> $c$r -i
TYPE=PPP
The script modifications for a computer with a dataphone
are as follows:
[UCF]
SCRIPT=-n $r$2$r$2$r MODIFY?
c$r NUMBER: MAIL$r COMPLETE
$r$2$r$2$r$2$r CS>
slip$r -i
TYPE=PPP
Note: The above
SCRIPT=
text for a dataphone is shown on two lines due to space limitations.
In your file, the text should all be on one line.
Once you have made the necessary changes save the
file and return to Custom.
From the Setup menu Select Log. This
will bring up a screen that will show you the commands that are
issued to your modem and what information it receives. Watch this
screen carefully. If you have any difficulty connecting to the
terminal server, the messages shown may help you (and the E-Mail
and Internet Help Desk) to diagnose the problem.
Now select Connect from the Custom Menu.
This will bring up a screen from Netmanage advertising their products
(this is dependent on where you obtained the copy). Once you are
done reading the window click on OK. A window with the
title Connect and the number you are calling will appear.
The program will proceed to connect to the terminal
server. You can view the program connecting to the terminal server
in the log screen; this will show you if there are any problems,
and where they are occurring.
Once the program is connected the above connect window
will disappear and the Connect selection will change to
Disconnect.
This will give you a PPP connection to the UCF terminal
server. You can now run any of the TCIP/IP programs that you have
such as Netscape or telnet clients.
A good way to check whether it is working correctly
or not is by using Ping, which is one of the programs in
the Chameleon Sampler group. Double click on the icon and it will
bring up a window with a menu. Select Start and it will
bring up a window. In this window type pegasus.cc.ucf.edu.
It should start sending out signals and you should see it receiving
in the window. If it says "no packets were received",
your connection is not working correctly. Select Stop and
try it again.
Now that your connection is established you can open
your TCP/IP applications. If you have not obtained or installed
Netscape on your PC, see page 54 and follow the steps for downloading
and installing Netscape.
In order to end your connection, select Disconnect.
If you have any questions or problems you can send
mail to the help account on Pegasus or you can call the Help Desk at 823-5117.
DIAL-UP NETWORKING FOR WINDOWS
'95
NOTE: If you only wish to access Pegasus and
not the Internet, then use Hyperterminal instead of Dial-up Networking.
See the dial-up instructions on page 7 for instructions on how
to set up your session and your modem.
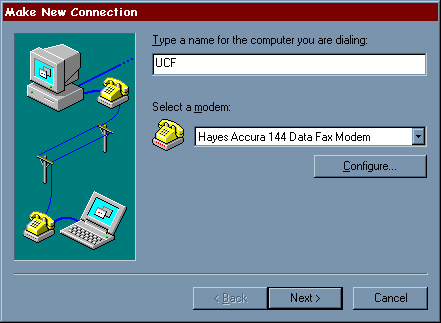
In the box underneath 'Type a name for the computer
you are dialing:' enter UCF. The modem section should already
have your modem listed in it. Note: If your modem has not
been setup up already the 'Install Modem Wizard' will start automatically
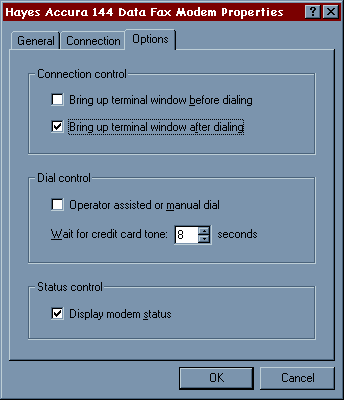
and set up your modem. Click on the Configure button. After
clicking on the 'Options' tab the following window should appear:
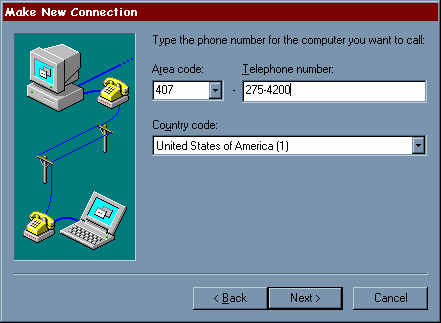
Click on the 'Next>' button
and the following window should appear:
In the 'Telephone number' area type one of the following numbers
Note: If you are dialing from on campus, you will need
to add a '7,' to the beginning of the phone number to dial
in. Click on the 'Next>' button to continue. The next box tells
you that your connection is finished. Click on the 'Finish' button
to exit out of the Wizard. You should now see a window called
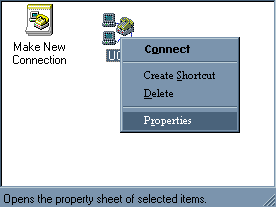
'Dial-Up Networking' with two images in it. Right click on the
'UCF' icon and then click on 'Properties' as shown in the following
image:
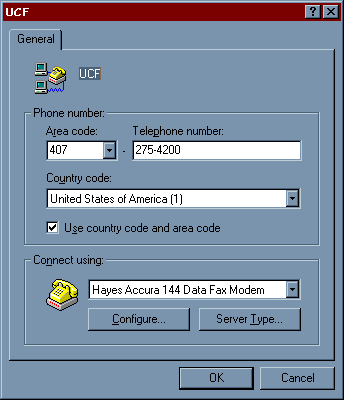
This should bring up a properties window as shown
below:
NOTE: If you have a newer
version of Windows 95, you may see a different window than from
what is shown in this handbook. However, the configuration process
will still be the same. If you have difficulty, please call the Help Desk (823-5117) for assistance.
In this area click on the 'Bring up terminal after
dialing' check box. Click on the 'OK' button. This will return
you to the original Wizard screen.
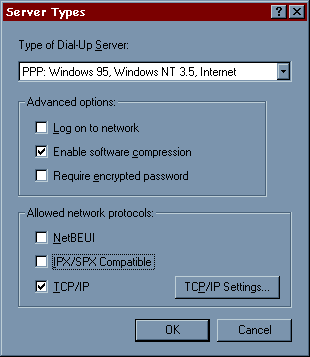
Click on the 'Server Type' button. This will bring
up another window. In this window make sure that the 'Log on to
network' option is not checked. If this option is check, click
on the check mark area to deselect it. If this option is checked
you will have problems connecting later. In the section labeled
'Allowed Network Protocols' make sure that only TCP/IP is selected.
The windows should look like the following:
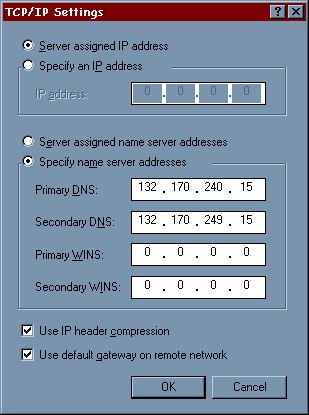
Press the 'TCP/IP Setting button. This brings up
another window. In this section, make sure that 'Server assigned
IP address' is selected. Click on 'Specify name server
addresses' and then put the following information into the fields:
Primary
DNS: 132.170.240.15
Secondary
DNS: 132.170.249.15
Make sure that the option for default gateway is
enabled. When you are finished the window should look like the
following:
Click the 'OK' button to exit out of the 'TCP/IP
Settings' area, click the 'OK' button to exit out of the 'Server
Settings' area, and click the 'OK' button to exit the properties
of this connection.
Entering PPP mode.
Async interface address is unnumbered
(Ethernet0)
Your IP address is 132.170.nnn.nnn.
MTU is 1500 bytes
At this point click the 'Continue' button
on the terminal window (or press F7). The system will then tell
you that you are connected to the system, and the speed that you
are connected at.
Now that your connection is established you can open
your TCP/IP applications, such as Internet Explorer or Netscape.
If you wish to use Netscape instead of Internet Explorer, use
Internet Explorer to access the Pegasus download page at the following
address:
http://pegasus.cc.ucf.edu/~help/download/
Save the file on your pc, and then click on Start,
then Run. When the window opens, type in the name of the file
you downloaded. Netscape will then be installed on your pc.
If you wish to log on to Pegasus, click on Start,
then Run. When the window opens, type the following:
telnet 132.170.240.30
Then click on the 'OK' button. After a few seconds,
a login prompt will appear where you can type your pegasus login
name.
Make sure that you have selected the 'open terminal
after dialing option' in the modem configuration/options dialog
box.
I'm connecting and logging in, but I get an error
message stating that Dialup Networking cannot log into system.
Make sure that you have turned off the 'Log into
system' option in the 'Server Types' Dialog Box.
I'm connecting through to the system, but then
I cannot access anything on the Internet. Every time I attempt
to go somewhere I get a 'No DNS entry' or 'Domain Name failed'
error.
Check and make sure that you have entered in the
correct settings for the DNS in the properties/server_type area,
and that the 'use default gateway on remote network' option is
selected.
I'm connected to the system, but I get an error
message stating that Dialup Networking cannot negotiate the requested
protocols.
First make sure that in the 'Server Types' section
only the 'TCP/IP' protocol is selected. If it is, then enter the
Control Panel (Start Settings Control Panel) and double-click
on the 'network' icon. You will see a screen similar to the following:
NOTE: If you have a newer
version of Windows 95, you may see a different window than from
what is shown in this handbook. However, the configuration process
will still be the same. If you have difficulty, please call the Help Desk (823-5117) for assistance.
Under 'The following network components are installed:
' you will see a list; make sure that three things are in that
list:
If Client for Microsoft Networks isn't there, click
on the 'Add' button and double click on 'Client'. Select 'Microsoft'
under 'Manufacturers: ' and 'Client for Microsoft Networks' under
'Network Clients: ', then click on 'OK'.
If Dial Up Adapter isn't there, click 'Add' and double
click on 'Adapter'. Under 'Manufacturers: ' select 'Microsoft'
and under 'Network Adapters: ' select 'Dial Up Adapter'. Click
'OK' when you are finished.
If TCP/IP isn't there, click 'Add' and double click
on 'protocol'. Select 'Microsoft' in the 'Manufacturers: ' box
and 'TCP/IP' in the 'Network Protocols: ' box. Click 'OK' to add
TCP/IP to the list of network components. Once it has been added,
go to it in the list and double click on it. You will see a window
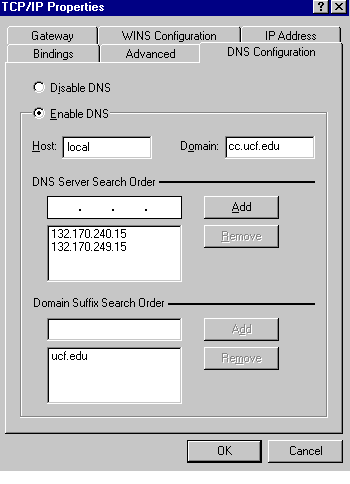
appear called 'TCP/IP Properties'. There are six tabs at the top;
click on the tab that says 'WINS Configuration'. Click on the
circle next to 'Disable WINS Resolution', then click on the 'Bindings'
tab. Make sure that 'Client for Microsoft Networks' appears in
the box with a check next to it, then click on the 'DNS Configuration'
tab. Select 'Enable DNS' and type 'local' as the Host Name and
'cc.ucf.edu' as the Domain Name. Click in the box under 'DNS Server
Search Order' and type '132.170.240.15', then click on 'Add'.
Go back to the box and type '132.170.249.15' and click on 'Add'
again. Finally, click in the box under 'Domain Suffix Search Order'
and type 'ucf.edu', then click on 'Add'. The DNS Configuration
window should look like the following when you are done:
Click on the 'OK' button at the bottom of the screen
and you will be returned to the screen with the list of network
components. Click on the 'OK' button at the bottom of that screen
and you will be asked to restart the computer to make the changes
take effect. Restart your computer, then go to your UCF icon in
the Dial Up Networking folder and try to connect again.
DIAL-UP NETWORKING FOR WINDOWS
NT 4.0
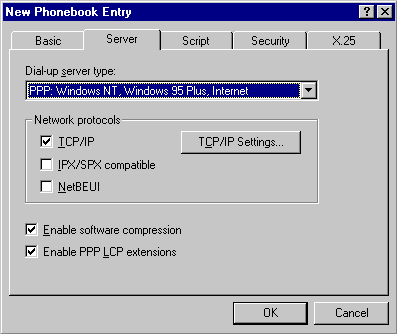
Once you have done this, click on the 'Server' tab. The following window will appear:
In the section labeled 'Network Protocols' make sure
that only TCP/IP is selected. Once you have done so, click on
the button labeled 'TCP/IP Settings'. A window labeled 'PPP TCP/IP
Settings' should appear. In this section, make sure that 'Server
assigned IP address' is selected. Click on 'Specify name server
addresses' and put the following information into the fields:
Primary DNS: 132.170.240.15
Secondary DNS: 132.170.249.15
Make sure that the option for default gateway is
enabled. When you are finished, the window should look like the
following:
Click the 'OK' button to exit out of the 'PPP TCP/IP
Settings' window, which will take you back to the 'New Phonebook
Entry' window. Click on the 'Script' tab, and the following window
will appear:
Select 'Pop up a terminal window' and click on the
'OK' button. You will be returned to a screen that shows the name
and phone number of the phonebook entry you just created. You
can dial into the system from this screen.
Entering PPP mode.
Async interface address is unnumbered
(Ethernet0)
Your IP address is 132.170.24.157.
MTU is 1500 bytes
At this point, click on the 'Done' button at the
bottom of the After Dial Terminal window. The system will say
it is verifying your username and password and then will display
a window telling you that you have successfully connected.
Now that your connection is established you can open
your TCP/IP applications, such as Internet Explorer or Netscape.
If you wish to use Netscape instead of Internet Explorer, use
Internet Explorer to access the Pegasus download page at the following
address:
http://pegasus.cc.ucf.edu/~help/download/
Save the file on your pc, and then click on Start,
then Run. When the window opens, type in the name of the file
you downloaded. Netscape will then be installed on your pc.
If you wish to log on to Pegasus, click on Start,
then Run. When the window opens, type the following:
telnet pegasus.cc.ucf.edu
Then click on the 'OK' button. After a few seconds,
a login prompt will appear where you can type your pegasus login
name.
To disconnect from the system, go back to Dial-Up
Networking. You should see a window that has the UCF phonebook
entry information. There is a 'Hang Up' button at the bottom of
the window; click on that button and you will be disconnected.
Installing the Internet Starter Kit on your Macintosh
is quite easy. The kit comes with all of the required software
on a 3.5" disk. All you need to do is run the ISKM Installer
on the disk.
Start the installation program and bring up the Read
Me file. Check here for any important information that the
manufacturer has provided. Once you are done reading, select Continue.
This will bring you to the next window which asks you if you want
to set up the software for another commercial Internet Service
Provider. Select Custom so you can install it for UCF's
server.
A listing of different installation options will
appear. Select Full MacPPP Install from the menu, then
click on Install. The installation procedure will load
all of the software required to connect to the Internet.
If you are an advanced user and you have downloaded
the software as Obtaining Internet Software directed, you must be sure to 'unstuff' the
file and then drop the icons into the system folder. The system
will prompt you whether to automatically place them in the correct
places.
Once the software installation completes, you will
need to configure both MacTCP and MacPPP.
Select the PPP icon, then click on More.
The following window will appear:
There are four entries that can be modified here.
Modify them as follows:
Select Server.
Click on the small slider and move it such that the
Subnet Mask is set to 255.255.255.0
Set domain to an asterisk (<*>).
Set IP Address to 132.170.240.15. Click on Default
next to the IP Address box.
The Gateway Address: box should have 0.0.0.0
in it. You will not be able to change anything in it when you
selected server at the Obtain Address box.
If you have successfully set each entry, your window
should look like the one shown above.
Select OK and close the MacTCP control panel
window. Your machine may tell you that you need to restart the
machine; go ahead and do this. Now you are ready to configure
MacPPP.
Place any prefixes you need here before
the number.
At the Modem Init dialog box type in whatever
initialization string you use for your modem. If you are using
a dataphone, you may leave this blank. The initialization string
should enable hardware handshaking and disable DTR. Consult the
manual that came with your modem for more details. If you don't
know what the initialization string is and you used the Internet
Starter Kit, the file Modem Strings lists initialization
strings for some of the more popular modems. This file is in the
MacPPP 2.01 folder in the ISKM folder.
Below are the instructions of what you should do
for each line if you are using a modem:
Once you are done select the OK button.
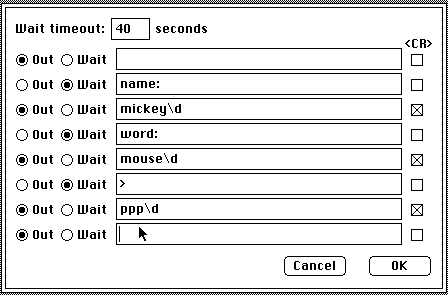
Below is an example of what the completed
dialog box would look like for a user called mickey with a password
of mouse and is using a phone modem:
Note: If you change your
Pegasus password, be sure to update the password in your connect
script.
Below are the instructions of what you should do
for each line if you are using a dataphone:
Once you are done select the OK button.
Below is what the completed dialog box should look
like:
When you are back at the configuration window click
on Done. Close the control panel by clicking on the close
window button on the top left hand corner.
Now you are ready to run all your Software that came
with the Internet Starter Kit. For information on running the
software, refer to the Internet Starter Kit manual.
If you have any questions or comments please refer
them to the Help Desk at 823-5117 or
send us email at helpdesk@mail.ucf.edu.Domain Servers
Domain Servers are machines that hold the names of
machines on the Internet. Select Services and then
Domain Servers. Shown below is a listing of the numbers
that need to be placed into the boxes:

Modification of Scripts
This is the last modification that needs to be made
in order to run Chameleon on the UCF terminal server. With a text
editor (notepad, for example) open the slip.ini
file located in the netmanag directory (if you installed
Chameleon in another directory, look for it in that directory).
In this file you should find an entry that has the name of the
interface that you just configured, which is UCF. Below it is
a line that begins with SCRIPT= . This line needs to be modified
so that it looks like the lines below. Be careful as you type;
uppercase and lowercase letters do make a difference.
Running Chameleon
Now you are ready to run Chameleon. Select the interface
that you want to run (UCF).


Minimum Requirements
Installing Dial-up Networking on your computer
When installing Windows '95, you are given the choice
to install Dial-up Networking on your computer. If you are not
sure you installed Dial-up Networking, go to the control panel
(Start Settings Control Panel), and select
'Add/Remove Programs'. In this area there are three tabs, the
second of which says 'Windows Setup'. In the 'Communications'
section under this tab (double click the 'Communications' item),
there should be a check mark by the 'Dial-up Networking' label.
Click 'OK' to get out of this window, and the window for the 'Add/Remove
Programs'. You will need your windows '95 program disks (or CD)
in order to install this program.
Configuring Dial-up Networking
To start Dial-up Networking, click on the icon in
the Accessories group (Start Programs Accessories
Dial-Up Networking). The 'Make New Connection' Wizard should
appear. If it does not, double click on the 'Make New Connection'
icon to start the program. The image below is the first window
of the 'Make New Connection' Wizard:
(407)275-4200 Main UCF campus and Orlando area
(407)513-4200 Main UCF campus and Orlando area
(407)636-9985 Brevard Area
(904)255-9906 Daytona Area
Using Dial-up Networking to connect to the Terminal Server
To dial into the system, double click the 'UCF' icon
in the 'Dial-Up Networking' window. This will bring up a dialing
window. Click the 'Connect' button to call the terminal server.
The modem will dial, and after the modem connects, a terminal
window will appear, with a prompt asking for your 'Username:'.
Enter in your login id for Pegasus and press <ENTER>.
The next prompt will ask you for your 'Password:'. Enter in your
password for your Pegasus account and press <ENTER>.
At this point you will see a prompt similar to as5100-xx>.
Type in 'ppp'
and press <ENTER>.
You will then see something similar to the following messages:
Troubleshooting
I'm connecting to the system, but nothing else
happens.

Minimum Requirements
Configuring Dial-Up Networking
To start Dial-Up Networking, click on the icon in
the Accessories group (Start Programs Accessories Dial-Up
Networking). A window will appear telling you that the phonebook
is empty. Click on the OK button to add an entry. You will then
see the 'New Phonebook Entry' box. Click in the box next to 'Entry
Name' and type UCF. Then, click in the box next to 'Phone Number'
and type one of the following numbers.
(407)275-4200 Main UCF campus and Orlando area
(407)513-4200 Main UCF campus and Orlando area
(407)636-9985 Brevard Area
(904)255-9906 Daytona Area


Using Dial-Up Networking to connect to the Terminal Server
To dial into the system, go to Dial-Up Networking
(Start Programs Accessories Dial-Up Networking). If
UCF is your only phonebook entry, then a dialing window will be
brought up with the information to connect to UCF already in it.
Click on the 'Dial' button to call the terminal server. A small
window will appear asking you to enter a username and password.
You do not need to do so here; click on the 'OK'
button to close the window. The modem will dial, and after it
connects an After Dial Terminal window will appear, with a prompt
asking for your 'Username'. Enter your login id for Pegasus and
press <ENTER>.
The next prompt will ask you for your 'Password:'. Enter in your
password for your Pegasus account and press <ENTER>.
At this point, you will see a prompt similar to as5100-xx>.
Type in 'ppp' and press <ENTER>.
You will then see something similar to the following messages:
INTERNET STARTER KIT FOR MACINTOSH
NOTE: This software will
not work correctly on most PowerMacs, especially those with ethernet
connections. This software is also not required for System 7.5
and above. For all Macintosh systems, we recommend you use FreePPP,
which is described beginning on page 85.
Minimum Requirements
Installing the Internet Starter Kit On Your Machine
The directions given in this section are for MacPPP
in the Internet Starter Kit. If you downloaded a copy of MacPPP
from the Internet, the setup screens shown in this section may
differ slightly from what you will see. However, the general configuration
instructions given in this section should still work.
Configuring MacTCP
The first program that needs to be configured is
MacTCP. Pull down the "apple" menu from the left
side of the menu bar and select "Control Panels". Then
open the MacTCP control panel. Doing so brings up
this window:


Configuring MacPPP
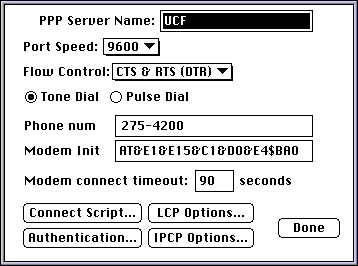
Select ConfigPPP from your Control Panels.
This will bring up the initial configuration window, shown below.

(407)275-4200 Main UCF campus and Orlando area
(407)513-4200 Main UCF campus and Orlando area
(407)636-9985 Brevard Area
(904)255-9906 Daytona Area

Connecting to the terminal server
Once the configuration set-up is completed you are
ready to run PPP.
Disconnecting from the terminal server
To close your connection to the terminal server select
Hard Close on the ConfigPPP control panel.
| (407)275-4200 | Main UCF campus and Orlando area |
| (407)513-4200 | Main UCF campus and Orlando area |
| (407)636-9985 | Brevard Area |
| (904)255-9906 | Daytona Area |
Connect: Using Terminal
Window
When you are finished, the window should look as
follows:
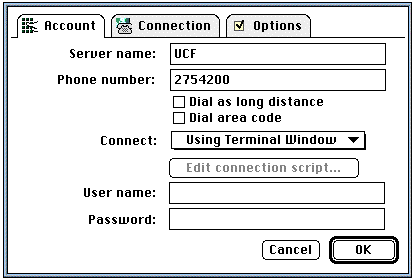
Click on the OK button. You will return to
the Accounts screen where you should see the UCF account you just
created. Now click on the General tab, and then click on
the Modem Setup button. The following window will appear:

Normally, you should use the default settings in
this window. If you experience difficulties with your modem, you
can change the modem initialization string by clicking on the
Use: button and typing in either AT&F
or some other initialization string appropriate for your modem
(consult your modem's documentation for more details). When you
are finished, click on the OK button. You will return to
the General window.
In the General window, click on the Open TCP/IP
button. The following window will appear:

Fill in the fields as follows:
Connect via: FreePPP
Configure: Using PPP Server
Name server addr.: 132.170.240.15
132.170.249.15
When you are finished, click on the small square
located in the upper-left corner of the window. You will be asked
if you want to save the changes for the current configuration;
click on the Save button.
You are now ready to connect to the terminal server.
Click on the connect button at the top of the FreePPP Setup
box. You should hear your modem dial and connect to the terminal
server. After a successful connection, a box will appear. Fill
in your userid and password when prompted. At the as5100-xx>
prompt, type ppp. Below is an example screen:

Make sure that the Autodetect PPP Startup box has an 'X' in it. If not, click on the box and an
'X' will appear. With this box checked, FreePPP will
automatically detect when PPP communications have begun. You can
start PPP manually by clicking on the Start PPP button
as soon as you see garbage characters at the bottom of the window.
When the button at the top of the FreePPP Setup screen changes
from Connect to Disconnect, PPP communication has been successfully
established. You may now use any TCP/IP software, such as a web
browser.
When you are finished and wish to disconnect, click
on the Disconnect button at the top of the FreePPP Setup
box.
| Phone Number:Orlando area | (407) 275-4200 (407) 513-4200 |
| Phone Number:Brevard area | (407) 636-9985 |
| Phone Number:Daytona area | (904) 255-9906 |
| BAUD Rate: | 28800, 14400, 9600 |
| Data Bits: | 8 |
| Stop Bits: | 1 |
| Parity: | None |
| Flow Control: | Hardware |
| IP Address: | Dynamically assigned |
| Domain Name Server (DNS): | 132.170.240.15 |
| Alternate Name Servers: | 132.170.249.15 |
| Time Server: | None, leave it blank |
| Netmask, Subnet Mask: | 255.255.255.0 |
| Domain: | cc.ucf.edu |
| NNTP (News) Server: | news.cc.ucf.edu |
| SMTP (Mail) Server: | pegasus.cc.ucf.edu |
| POP3 Server: | pegasus.cc.ucf.edu |
| IMAP Server: | pegasus.cc.ucf.edu |
| Help Desk: | (407) 823-5117 |
| help@pegasus.cc.ucf.edu |
pegasus% homepagesetup
The necessary directory and files will be created.
All of your Web files will go into the public_html directory
under your home directory. There are two files you will always
need. First is the .htaccess file, which controls access
to your directory. Without this file, httpd (The Web server daemon)
will not serve your documents. The second file is your home.html
file, the actual document pointed to in the list of Pegasus user
home pages.
The sample home.html created for you contains
a very short tutorial on basic HTML (HyperText Markup
Language). For more information, please see the HTML
Primer
or http://www.ucf.edu/outside.html#HTML.
When your home page is ready for use, this is the
address (URL) you and others can use to access your page:
http://pegasus.cc.ucf.edu/~userid
where userid is your Pegasus userid. Don't
forget the tilde (<~>),
located next to the (<1>)
key (on most keyboards).
This section also presents several examples of how
a web page might look after using the given language elements.
Please note that due to differences between web browsers, the
examples may not look exactly like what you may see with your
web browser.
Please send any comments and suggestions you may
have to the E-Mail and Internet Help Desk at help@pegasus.cc.ucf.edu
<tag>
Note the use of the less-than and greater-than
symbols. In this section of the handout, these symbols are a required
part of each tag (unlike the rest of this handout where they are
used to denote keystrokes). Many tags also have a special form
to denote the end of a formatting instruction; the syntax is as
follows:
</tag>
Note the forward slash in between the less-than symbol
and the tag name.
The following elements are discussed in this subsection:
The Title ElementEach page you create should
have a title. Often pages will be referred to by their title rather
than their address for convenience. The syntax is as follows:
<TITLE>text</TITLE>
For example:
<TITLE>UCF Central Home
Page</TITLE>
Each document should only have a single title element.
To avoid confusion, the title element should be placed at the
beginning of the file.
The Header ElementsIn order to differentiate
between sections of your document, you can use a header element.
The header elements create "chapter headings" that can
be used to separate sections of text. There are six different
levels of header, numbered 1 through 6. The syntax is as follows:
<Hn>text</Hn>
Where n is a header level number between
1 and 6. For example:
<H1>Information available
from this site</H1>
Typically header level 1 is the most emphasized,
often shown larger than normal text. From there level 2 is a bit
smaller or less emphasized than level 3, all the way down to level
6. But, this is only a general guideline as the exact representation
of the headers is browser dependent and can vary greatly. The
relative importance of each header to the others is specified,
but there are no guidelines for exactly how each level should
be represented.
Paragraph Break Element In order to separate
paragraphs, use the paragraph break element <P>.
This will create a blank line or space between the preceding text
and the text following the paragraph break element. You do not
need a closing tag with the paragraph break; the paragraph break
will occur where the <P>
element is located in the file.
Line Break ElementLess emphatic than the paragraph
break is the line break element <BR>.
This element ends the current line and starts a new line on the
line immediately following the current line (unlike the paragraph
break, which would leave a blank line). You do not need a closing
tag with the line break; the line break will occur where the <BR>
element is located in the file.
Bold ElementsYou can emphasize a section of
text by making it bold. The syntax is as follows:
<B>text</B>
For example:
You may call the <B>Help
Desk</B> for further assistance.
Italics ElementsYou can also emphasize a section
of text by making it italicized. The syntax is as follows:
<I>text</I>
For example:
Don't forget to include your
<I>name</I> in your request.
The Anchor elementWhat makes the Web a unique
Internet tool is the ability to access related documents and information
servers by using "links" within a document. To create
these links, you use the anchor element.
Before you can use the anchor element, you need to
know the URL of the page you wish to link to. URL stands for Universal
Resource Locator and serves as a unique address for HTML pages
and certain other information resources. The syntax for the URL
of a web page is:
http://address[/path][/filename]
where address is the location of the
remote system on the Internet, path is optionally
(do not type the brackets) the location of a web page on that
system, and filename is optionally (do not type
the brackets) the name of a web page to look at. In most cases
the address is all you need as the remote system has established
a default web page with the address. For example, the URL for
the UCF home page is:
http://www.ucf.edu/
The URL can get more complicated if you need to specify
a path and file name to get to a particular web page, as in the
following URL for the UCF interactive campus map:
http://www.ucf.edu/campus/html/campus.html
Sometimes a tilde (located next to the 1 key on most
keyboards) is used to denote a specific user on a system, as in
the following URL to get to the software download page on the
Pegasus Help account:
http://pegasus.cc.ucf.edu/~help/download/
With the above URL information in mind, here is the
syntax for an anchor element:
<A HREF="url">text</A>
Where url is the URL of the web page
you want to link to, and text is how you want the
link to appear on your web page. For example:
Here is a list of all
<A HREF="http://www.ucf.edu/servers.html/">information
servers</A>
available at UCF.
Depending on the web browser you are using, the link
text can appear highlighted, underlined, or in reverse text. When
you use the mouse or cursor to select the link text, the web page
indicated by the anchor will be displayed.
The Horizontal RuleThe Horizontal Rule element
creates a horizontal line separating two sections of text. In
graphical browsers it is often a sharp line, and in text browsers
it is often a sequence of hyphens or similar characters. To create
a Horizontal Rule, put <HR>
where you wish the line to be in your document.
The Unordered ListThe Unordered list is the
simplest of the list types. Typically, each item in the list is
preceded by a bullet or box in graphical browsers, or some character,
often an asterisk, in text browsers. The syntax of an unordered
list is:
<UL>
<LI>text
...
</UL>
For
example, a list of the days of the week would look like:
<UL> <LI>Monday <LI>Tuesday
<LI>Wednesday <LI>Thursday <LI>Friday <LI>Saturday
<LI>Sunday </UL>
And might be displayed by a browser as:
Within each list entry, you can use other HTML elements,
such as bold, italics, and anchors, to create better looking lists.
You can even nest new lists within the current list, but be careful
to check the placement of the opening and closing elements of
all the lists.
The Ordered ListThe Ordered list is very similar
to the unordered list, but instead of a bullet or asterisk preceding
each item, the items in an ordered list have a definite order
and are preceded by numbers or letters to show that order. The
syntax of an ordered list is similar to that of an unordered list:
<OL>
<LI>test
...
</OL>
For
example, an ordered list of the months of the year would look
like:
<OL> <LI>January
<LI>February <LI>March <LI>April <LI>May
<LI>June <LI>July <LI>August <LI>September
<LI>October <LI>November <LI>December </OL>
And might be displayed by a browser as:
The Dictionary ListThe Dictionary list is
the third and most complicated of the list types. As the name
suggests, the dictionary list was created to be used in applications
where there would be a series of items, each with further information.
The syntax is as follows:
<DL>
<DT>text
<DD>text
...
</DL>
With the <DT>
tag you state the term you wish to define, and with the <DD>
tag you define the term. For example, a well known song from The
Sound of Music might be represented as:
<DL> <DT>Do <DD>A
deer, a female deer <DT>Re <DD>A drop of golden sun
<DT>Mi <DD>A name, I call myself <DT>Fa <DD>A
long, long way to run <DT>So <DD>A needle pulling
thread <DT>La <DD>A note to follow so <DT>Ti
<DD>I drink with jam and bread </DL>
And might be displayed by a browser as:
Do A deer, a female deerRe A drop of golden sunMi
A name, I call myselfFa A long, long way to runSo A needle pulling
threadLa A note to follow soTi I drink with jam and bread
Inline ImagesIncluding graphic images on your
web page enhances the information contained on that page. Rather
than lengthy text describing an object, you can simply show a
picture of it. The syntax for including an image is as follows:
<IMG SRC="path"
ALT="text">
where path describes the name and location
of the file containing the graphic image, and text
is optional descriptive text that would be displayed on text-only
web browsers. For example, if you wish to include an image file
named balloon.gif containing a picture of a balloon:
<IMG SRC="balloon.gif"
ALT="This is a balloon">
When incorporating images into your web page, keep
in mind how long they will take to load. Many people access the
Web through a 14.4k or slower modem. Even with a direct Internet
connection, very large images can take quite a while to transfer.
A good guideline is to keep images under 25k whenever possible.
Actually, it doesn't, but public_html is where the
server will look when it is given the ~USERID path statement.
What does this .htaccess file do?
That is the file that the server looks for to allow
people to get documents from a directory. By default, access to
a directory is restricted unless there is a .htaccess file to
override that setting. Note: If you create a subdirectory
under public_html, you will need to copy the .htaccess file into
that directory.
Why do I get a page saying "This document has moved here"
with a link to my home page?
That is because you left off the closing slash after
your userid. Try it again with the slash.
Where can I learn how to write HTML?
There is a page off of the UCF Home Page that has
a section on Web resources for HTML help. To get to it, select
Links and then Outside. There is also a wide variety
of HTML books in the local bookstores.
I have added other pages, but I keep getting "403 Forbidden"
errors?
Why aren't my images being loaded?
Whenever you add files, you will probably have to
change the rights so that people can access the files. To do this,
go into your public_html directory and issue the following command:
pegasus% chmod a+r *
If you have any subdirectories containing web material,
you will need to change the rights for those as well:
pegasus% chmod a+rx directory
where directory is the name of the
subdirectory to change the access rights for.
The above commands will grant read rights for everyone.
Try accessing the file again and see if it works. See UNIX FILE SECURITY (FILE PERMISSIONS)
for more information on file permissions.HOW TO SET UP A PERSONAL WEB HOME PAGE
A script has been created to assist you in configuring
your account to serve pages on the World Wide Web. From the Pegasus
prompt, type the following:
HTML PRIMER
The HyperText Markup Language, or HTML, is the language
that pages on the World Wide Web are written in. This section
will give you a basic understanding of how to write HTML, however
it does not represent the full scope of HTML. Many elements have
additional, more advanced parameters which are beyond the scope
of this introduction.
BASIC HTML TOPICS
The formatting of an HTML page is done through the
use of HTML elements, or tags as they are more commonly known.
A tag has the following syntax:
ADVANCED HTML TOPICS
This section discusses some more sophisticated methods
of formatting your web page. The following elements are discussed:
FREQUENTLY ASKED HTML QUESTIONS
Why does everything have to be in the public_html directory?